Day-6 of Becoming an AI Developer: Build an AI Chatbot with React (Vite) + Node.js
Create a local AI chatbot using React, Express, Ollama, and llama3 — with zero API cost and real-world architecture.
What if I told you that you can build your own ChatGPT-style chatbot without paying for OpenAI APIs, exposing secrets, or depending on cloud services?
Most developers think building an AI chatbot means:
- Paying for API credits
- Managing API keys
- Worrying about rate limits
- Sending private prompts to external servers
But here’s the surprising part:
You can run a powerful LLM locally on your machine and connect it to a modern React frontend using nothing more than Node.js + Ollama + llama3.
And yes — it actually feels like a real AI product.
In this article, we’ll build a working AI chatbot using:
- React + Vite
- Node.js + Express
- Ollama
- llama3
- Axios
- Tailwind CSS
By the end, you’ll have a functioning chatbot that sends messages and receives real AI responses — all running locally.
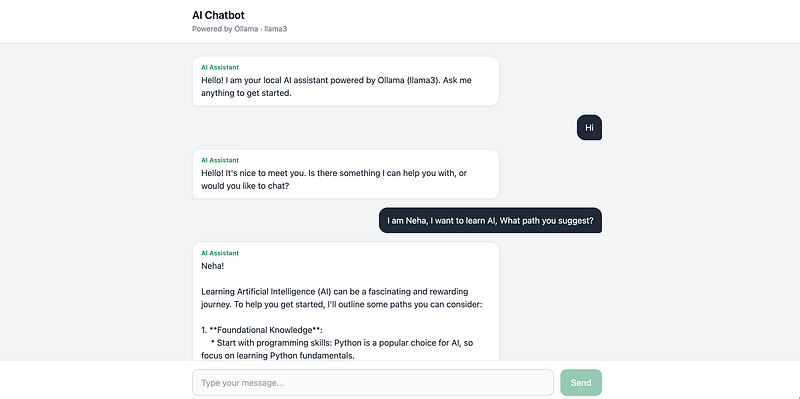
The chatbot shown in the image, we’re building this today.
Why Build an AI Chatbot Locally?
Before writing code, let’s answer an important question.
Why not just call OpenAI APIs?
For beginners and side projects, local AI has some surprisingly useful advantages.
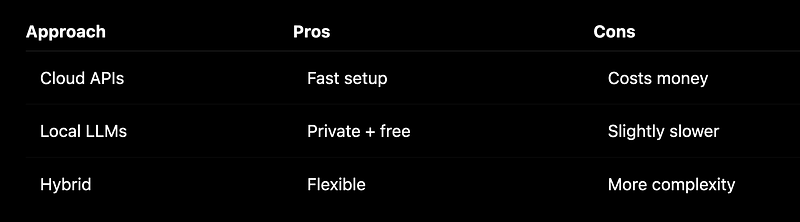
The biggest win?
You learn how real AI systems are architected.
Instead of directly connecting the frontend to AI, we’ll build a proper backend layer.
That separation matters in production systems.
Step 1: Set Up the Project Structure
We’ll use a structure that mirrors real-world applications.
AI-Chatbot/
├── frontend/
└── backend/
Why split frontend and backend?
Because mixing UI logic and AI communication quickly becomes messy.
The frontend handles:
- Chat interface
- User input
- Rendering messages
The backend handles:
- API routes
- Validation
- Communication with Ollama
This separation makes debugging dramatically easier.
Project Structure
AI-Chatbot/
├── frontend/ # React + Vite + Tailwind
│ └── src/
│ ├── components/
│ ├── api/
│ ├── App.jsx
│ └── main.jsx
└── backend/ # Node.js + Express
 ├── routes/
 ├── controllers/
 └── server.js
Project Setup
Tech choices
- React + Vite — Fast dev server, simple config
- Express — Lightweight HTTP API for Ollama
- Tailwind — Utility CSS, no large custom stylesheets
- Ollama — Local AI without cloud API keys
Step 1 — Project Setup
- Scaffold
frontend/(Vite React) andbackend/manually or with:
npm create vite@latest frontend -- --template react2. Frontend dependencies
cd frontend
npm install
npm install axios react-markdown react-syntax-highlighter
npm install -D tailwindcss postcss autoprefixer
npx tailwindcss init -p
3. Backend dependencies
cd ../backend
npm init -y
npm install express cors
Set "type": "module" in backend/package.json.
Key files
frontend/vite.config.js— proxy/api→ backend:
export default defineConfig({
 plugins: [react()],
 server: {
 port: 5173,
 proxy: {
 '/api': { target: 'http://localhost:3001', changeOrigin: true },
 },
 },
});
2. frontend/src/index.css — Tailwind directives (Get code from GitHub)
3. backend/server.js — health check:
app.get('/api/health', (req, res) => {
 res.json({ status: 'ok', message: 'Backend is running' });
});
Access GitHub files here
Step 2 — Build chat UI
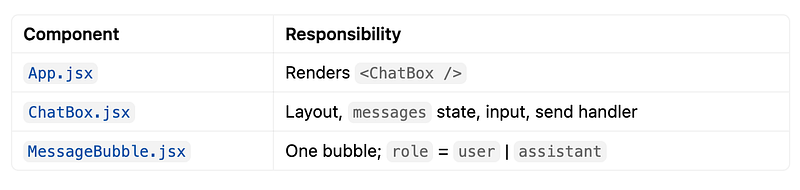
The app starts with demo messages.
function App() {
 return <ChatBox />;
}
Inside MessageBubble.jsx, role-based rendering controls styling.
const isUser = role === 'user';This tiny line determines:
- Left vs right alignment
- Bubble color
- AI labels
Pro tip
Always build message components separately.
A reusable bubble component prevents duplicated styles and makes future upgrades easier.
Access GitHub files here
Step 3 — Ollama + llama3 (Run AI Locally)
This is where things get interesting.
Instead of calling a cloud provider, we’ll run AI directly on our machine.
Install Ollama, pull llama3, confirm the model responds locally.
# Install: https://ollama.com/download (or brew install ollama)

ollama pull llama3
ollama list
ollama run llama3
Test Ollama API directly
curl http://127.0.0.1:11434/api/tagscurl -X POST http://127.0.0.1:11434/api/chat \
-H "Content-Type: application/json" \
-d '{
"model": "llama3",
"messages": [{"role": "user", "content": "Say hi in 3 words"}],
"stream": false
}'Ask something like:
Explain React in one sentenceHow it works (simple)
- Ollama listens on 11434
- You send JSON with
model+messages - llama3 generates text token by token
- Response includes
message.content
Tip: Use 127.0.0.1 instead of localhost In Node — avoids IPv6 connection issues on macOS.
Step 4 — Backend API integration
Now comes the backend magic.
Instead of letting React talk directly to Ollama, Express acts as a middle layer.
Why?
Because real applications need:
- Validation
- Error handling
- Security
- Clean APIs
Your route looks like this:
POST /api/chat — accept { message }, call Ollama, return { reply }.
router.post('/chat', sendMessage);The controller validates input:
if (!message?.trim()) {
 return res.status(400).json({
 error: 'Message is required',
 });
}
Then calls Ollama:
const ollamaResponse = await fetch(
 `${OLLAMA_URL}/api/chat`,
 {
 method: 'POST',
 headers: {
 'Content-Type': 'application/json',
 },
 body: JSON.stringify({
 model: 'llama3',
 messages: [
 {
 role: 'user',
 content: message,
 },
 ],
 stream: false,
 }),
 }
);
API contract
{ "message": "What is React?" }Success:
{ "reply": "React is a library for building UIs..." }Errors: 400 (empty message), 503 (Ollama down), 502 (Ollama error)
Key Files
- routes/chatRoutes.js
router.post('/chat', sendMessage);controllers/chatController.js
- Validate
message fetch('http://127.0.0.1:11434/api/chat', { model: 'llama3', messages: [...], stream: false })- Extract
data.message.content→res.json({ reply })
2. server.js
app.use('/api', chatRoutes);Verify
curl -X POST http://localhost:3001/api/chat \
 -H "Content-Type: application/json" \
 -d '{"message":"What is Node.js in one sentence?"}'
First call may take 5–20 seconds (model load).
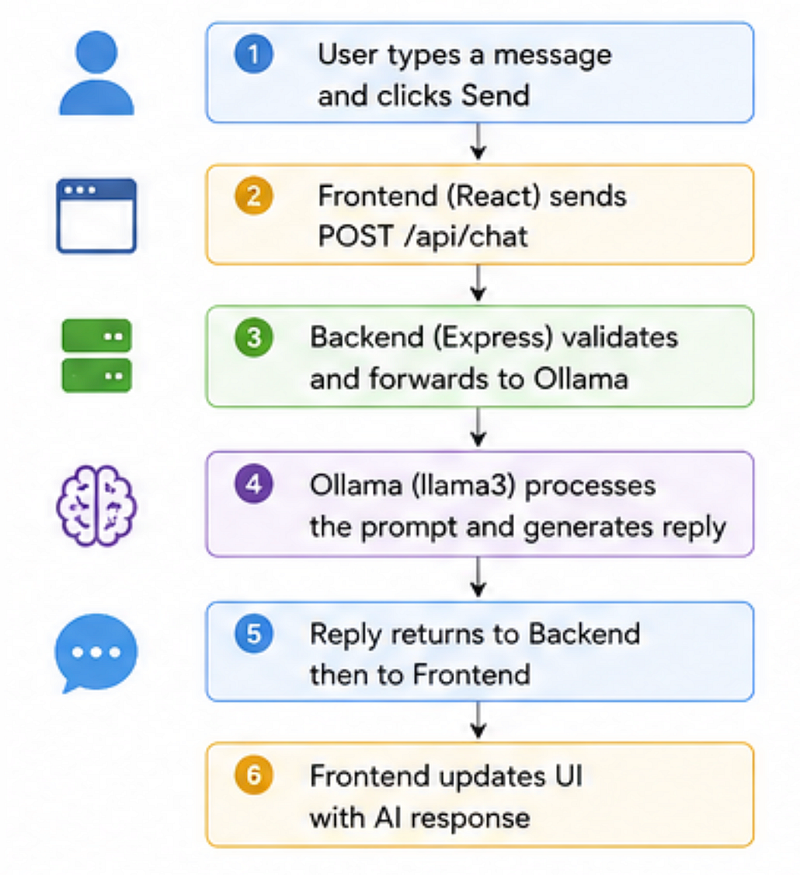
Step 5— Connect frontend and backend
On Send: call API, show real AI reply.
Message flow:
Files:
- api/chatApi.js
export async function sendChatMessage(message) {
const { data } = await api.post('/chat', { message });
return data.reply;
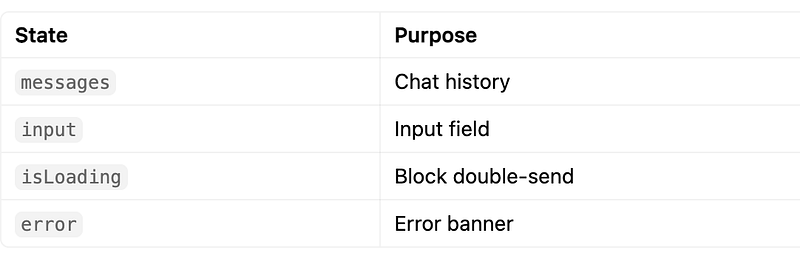
}ChatBox.jsx flow
- User submits → append user message immediately
setIsLoading(true)const reply = await sendChatMessage(trimmed)- Append assistant message with
reply catch→ showerr.response?.data?.errorfinally→setIsLoading(false)
Step 6: Run and Verify
Backend
cd backend
npm install
npm run dev
Health check: http://localhost:5000/api/health ( I have used 3001 as port)
Frontend
cd frontend
npm install
npm run devFor any confusion, look in the files on GitHub
🚀 Your Challenge: Upgrade the Chatbot
At this point, you have a fully working local AI chatbot.
But it still feels… unfinished.
That’s intentional.
Here’s your challenge.
Challenge 1: Add a Typing Indicator
Right now, the chatbot stays silent while thinking.
Improve UX by implementing:
AI is typing...- Loading animation
Hint: Try using isLoading state and a TypingLoader.jsx component.
Challenge 2: Add Markdown + Code Highlighting
AI responses often include:
- Code blocks
- JSON
- Bash commands
- Markdown formatting
Plain text won’t cut it.
Hint: Explore:
react-markdownreact-syntax-highlighter
Want to continue building?
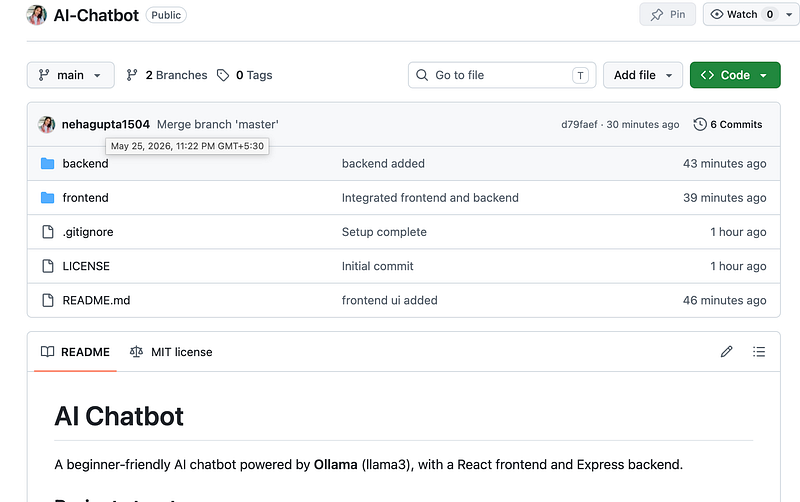
Fork the starter repo:
https://github.com/nehagupta1504/AI-Chatbot
The Surprising Payoff
Here’s the unexpected thing most developers realise after building this:
The hardest part of AI apps isn’t AI.
It’s architecture and UX.
The model is just one piece.
What actually makes products feel good is:
- Smooth loading states
- Great interfaces
- Clear response rendering
- Proper backend design
That’s what turns demos into real products.
Final Takeaways
You now have a local AI chatbot powered by:
✅ React + Vite
✅ Node.js + Express
✅ Ollama
✅ llama3
✅ Real AI responses
✅ Zero API cost
More importantly, you built it using a structure that resembles real production apps.
Now here’s the question:
If you were building the next version, what feature would you add first — memory, streaming responses, or file uploads?
🚀 Transitioning into AI as a developer?
I’m building a practical 30-day roadmap to help developers move into AI — step by step, without random tutorials or confusion.
👉 Follow this series so you don’t miss the next day.
👉 Bookmark this article — you’ll want to revisit it.
👉 What’s the biggest thing confusing you about AI right now? Drop it in the comments — I may cover it next.