Day-5 of Becoming an AI Developer: Build Your First AI App in Node.js — Using Ollama + Express
Learn how to build a real AI backend in Node.js using Ollama, Express.js, streaming responses, and local LLMs — without relying on paid APIs.
Hey Everyone, Welcome to Day 5 of Becoming an AI Developer
In this article, we’ll build your first real AI backend in Node.js using Express.js + Ollama, including:
✅ Local LLM setup
✅ Express API integration
✅ .env configuration
✅ Streaming responses (like ChatGPT typing)
✅ Real-world mini project
✅ Debugging tips & production practices
By the end, you’ll have a working AI backend running locally.
Why Ollama Instead of OpenAI SDK?
Most tutorials start with cloud APIs.
But if you’re learning AI engineering, local models teach you how things actually work.
Here’s why developers love Ollama:
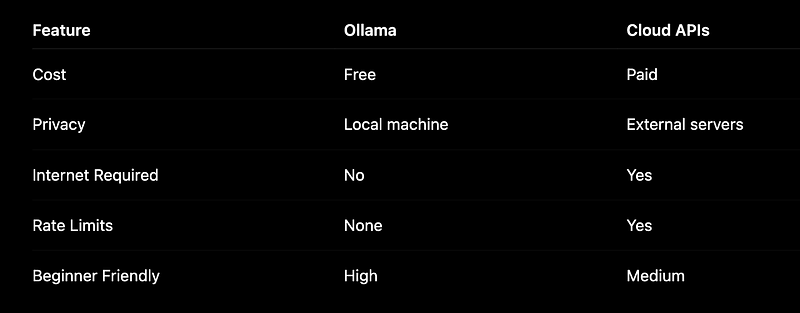
The tradeoff?
Local models can be slower depending on your laptop.
But for learning and prototypes?
Ollama is ridiculously good.
What We’re Building Today
We’ll build a simple AI backend:
Mini Project: AI Coding Assistant API
User sends a prompt:
{
 "prompt": "Explain closures in JavaScript"
}
AI responds in real time:
“A closure in JavaScript happens when…”
Just like ChatGPT streaming text.
Step 1: Install Ollama
First, install Ollama.
For Windows/ Mac/ Linux:
Download from: Ollama Official Website
Mac/Linux:
curl -fsSL https://ollama.com/install.sh | shNote: You can either install it or download it both works well
You can check whether it’s properly installed or not by using the command.
ollama --versionNow pull a model.
I recommend Llama 3 for beginners:
ollama pull llama3Run it:
ollama run llama3If it responds in the terminal:
>>> hi
Hello! How can I help?
You’re ready.
Step 2: Create Your Node.js Project
Initialise a backend project:
mkdir ollama-ai-app
cd ollama-ai-app
npm init -y
Install dependencies:
npm install express dotenv cors ollamaProject structure:
project/
│── server.js
│── .env
│── package.json
Step 3: Add Environment Variables
Create a .env file:
PORT=5000
MODEL=llama3
Why use .env?
Because hardcoding model names becomes painful later.
Imagine switching from:
llama3to:
mistral
deepseek-r1
gemma
One environment variable saves effort.
Step 4: Build the Express API
Now the fun part.
Create server.js
import express from "express";
import dotenv from "dotenv";
import ollama from "ollama";
import cors from "cors";

dotenv.config();
const app = express();
app.use(express.json());
app.use(cors());
const PORT = process.env.PORT || 5000;
const MODEL = process.env.MODEL;

app.post("/ask-ai", async (req, res) => {
 try {
 const { prompt } = req.body;
 if (!prompt) {
 return res.status(400).json({
 error: "Prompt is required",
 });
 }
 const response = await ollama.chat({
 model: MODEL,
 messages: [
 {
 role: "user",
 content: prompt,
 },
 ],
 });
 res.json({
 response: response.message.content,
 });
 } catch (error) {
 console.error(error);
 res.status(500).json({
 error: "Something went wrong",
 });
 }
});
app.listen(PORT, () => {
 console.log(`Server running on ${PORT}`);
});
Start server:
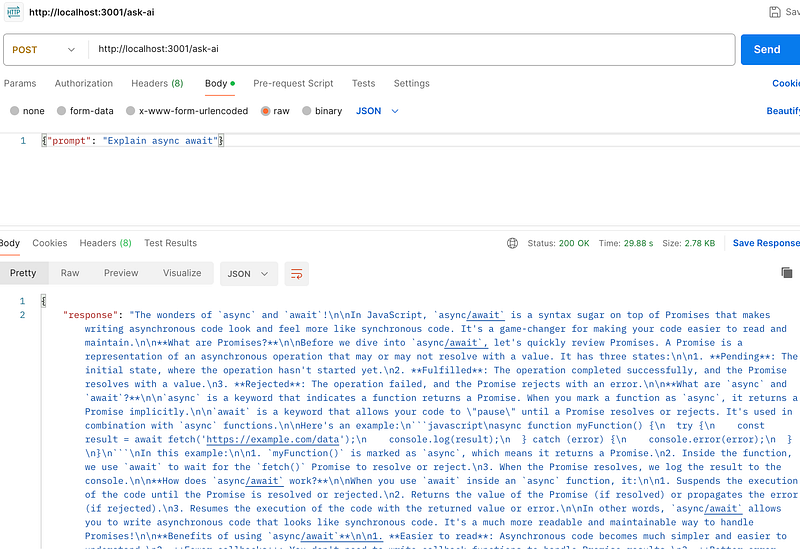
node server.jsTest in Postman:
POST /ask-aiBody:
{
 "prompt": "Explain async await"
}
Boom.
You just built an AI API.
Quick Code Breakdown (What’s Actually Happening?)
Before moving ahead, let’s quickly understand what this code is doing behind the scenes.
1. Setting Up the Backend
We import the required packages:
import express from "express";
import dotenv from "dotenv";
import ollama from "ollama";
import cors from "cors";- Express → creates our API server
- dotenv → loads environment variables from
.env - Ollama → connects Node.js to the local AI model
- cors → allows frontend apps to call the backend
2. Loading Environment Variables
dotenv.config();
const PORT = process.env.PORT;
const MODEL = process.env.MODEL;
Instead of hardcoding values, we store them in .env.
This makes model switching easy:
MODEL=llama3Later, you can simply change it to:
MODEL=mistralwithout touching the code.
3. Creating the AI API
app.post("/ask-ai", async (req, res) => {...This creates an API endpoint where users can send prompts like:
{
 "prompt": "Explain closures"
}
We extract the prompt:
const { prompt } = req.body;Then validate it to avoid empty requests.
4. Talking to Ollama
const response = await ollama.chat({
model: MODEL,
messages: [
{
role: "user",
content: prompt,
},
],
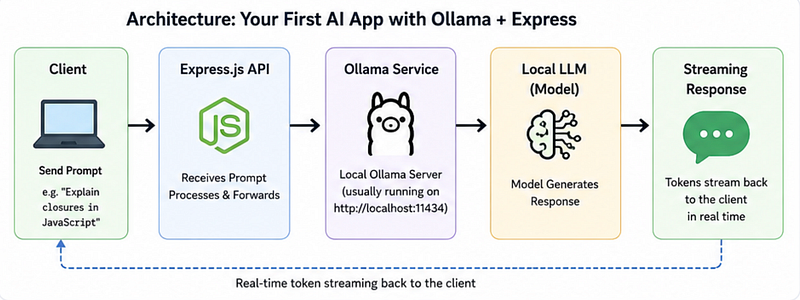
});This sends the user’s message to the local LLM (like Llama 3) running through Ollama.
Think of the flow like this:
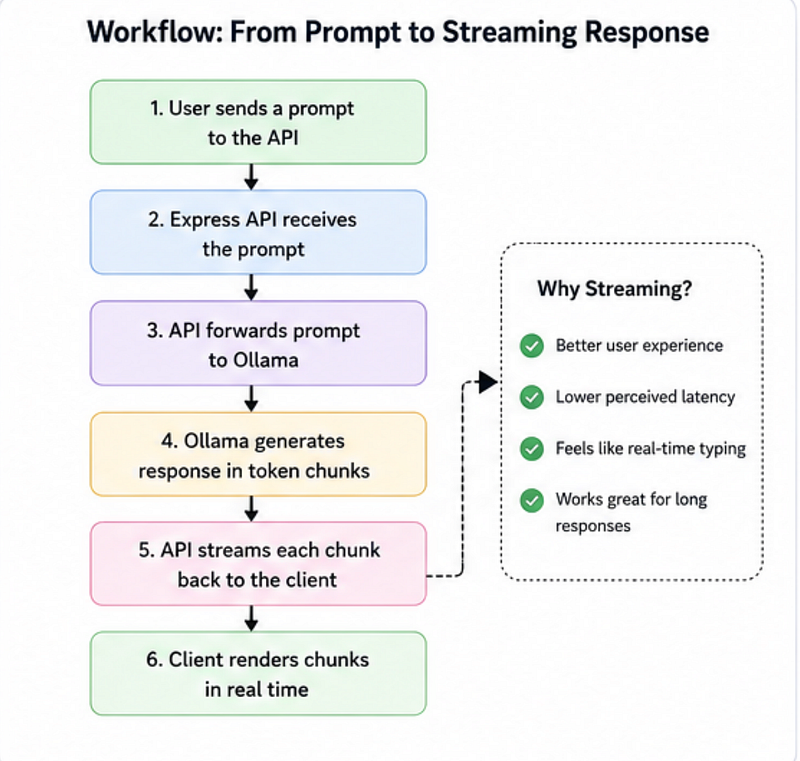
User Prompt → Express API → Ollama → Local AI Model5. Streaming Responses (The Cool Part)
Instead of waiting for the full answer:
stream: truelets us send chunks of text in real time:
for await (const chunk of stream) {
 res.write(chunk.message.content);
}
This makes the experience feel much faster — similar to how ChatGPT types responses gradually.
But This Still Feels “Static”
Here’s the mistake many beginners make:
They wait for the full response.
That’s not how modern AI apps feel.
ChatGPT streams responses word-by-word.
We can do that too.
Step 5: Add Streaming Responses
Update API:
app.post("/stream-ai", async (req, res) => {
 try {
 const { prompt } = req.body;
 res.setHeader(
 "Content-Type",
 "text/plain"
 );
 const stream = await ollama.chat({
 model: MODEL,
 messages: [
 {
 role: "user",
 content: prompt,
 },
 ],
 stream: true,
 });
 for await (const chunk of stream) {
 res.write(chunk.message.content);
 }
 res.end();
 } catch (error) {
 console.error(error);
 res.status(500).end();
 }
});
What’s happening here?
Instead of waiting for the complete output:
AI thinks → complete response → sendWe do:
AI thinks → chunk → send
AI thinks → chunk → send
AI thinks → chunk → send
Result?
A much smoother user experience.
Common Beginner Mistakes
1. Forgetting to Start Ollama
You’ll see errors like:
ECONNREFUSEDFix:
ollama serve2. Pulling the Wrong Model
This fails:
model not foundFix:
ollama pull llama33. Blocking Large Responses
Some developers accidentally freeze the API by generating huge outputs.
Safer approach:
prompt.slice(0, 1000);Always validate inputs.
A Surprisingly Useful Insight
Here’s something unexpected:
Local AI often makes you a better backend engineer.
Why?
Because when you don’t rely on black-box APIs, you start thinking about:
- response streaming
- model performance
- latency
- memory limits
- prompt structure
- server architecture
You stop “calling AI.”
You start engineering with AI.
And that mindset shift matters.
Suggested Workflow for Real Projects
- Run Ollama locally
- Create Express API layer
- Add streaming responses
- Add prompt validation
- Connect frontend later
- Swap models when needed
Example:
llama3 → coding assistant
mistral → fast responses
deepseek-r1 → reasoning
gemma → lightweight usage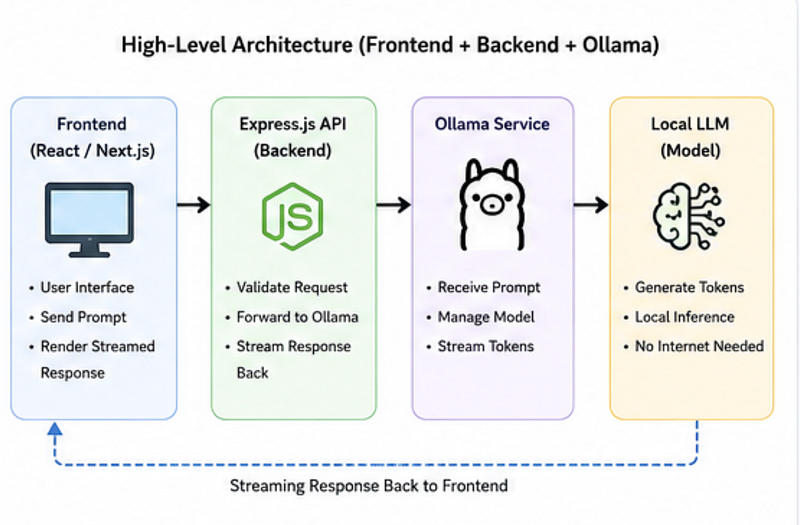
Your next step?
Try turning this into:
- AI Resume Reviewer
- Coding Interview Assistant
- Bug Explainer API
- LinkedIn Content Generator
Question for you:
If you had to build one AI-powered developer tool this week, what would you make first?
🚀 Transitioning into AI as a developer?
I’m building a practical 30-day roadmap to help developers move into AI — step by step, without random tutorials or confusion.
👉 Follow this series so you don’t miss the next day.
👉 Bookmark this article — you’ll want to revisit it.
👉 What’s the biggest thing confusing you about AI right now? Drop it in the comments — I may cover it next.