Build Your First MCP Server in Node.js- Beginner Friendly
Learn what MCP actually is, why developers are suddenly talking about it, and build your first production-ready MCP server in Node.js with practical examples.
Every AI App Is Repeating the Same Mistake
Here’s something most developers don’t realise yet:
A lot of AI apps today are still built like this:
App → OpenAI API → Custom Tool Logic → Database → ResponseEvery project rebuilds the same integrations.
- Need database access? Write custom logic.
- Need file access? Write custom logic.
- Need GitHub integration? More custom logic.
Eventually, your AI project becomes a collection of messy connectors.
This is exactly the problem MCP (Model Context Protocol) is trying to solve.
And if you’re a Node.js developer, learning MCP now might feel like learning APIs before REST became mainstream.
In this article, we’ll build your first MCP server in Node.js step by step.
You’ll understand:
- What MCP actually is
- Why developers are suddenly talking about it
- How to build your first MCP server
- Common mistakes to avoid
- How to make it production-friendly
What Is MCP (In Simple Words)?
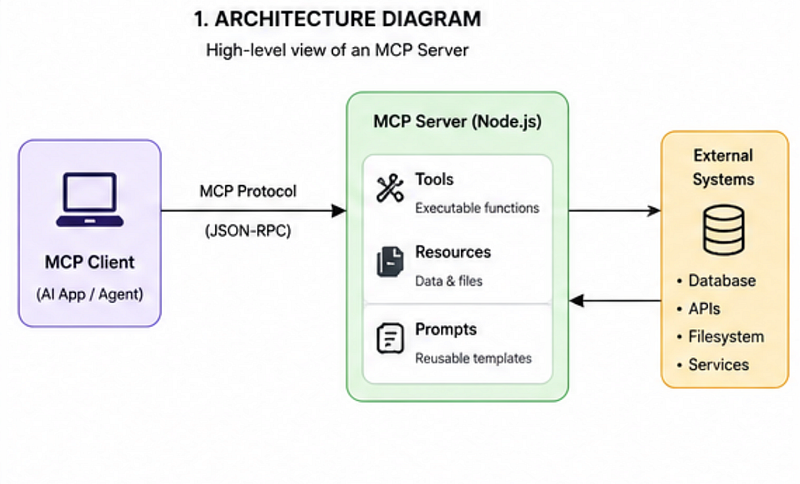
Think of MCP as a standard way for AI models to talk to tools and services.
Instead of hardcoding integrations inside every AI app, MCP lets you expose tools in a reusable way.
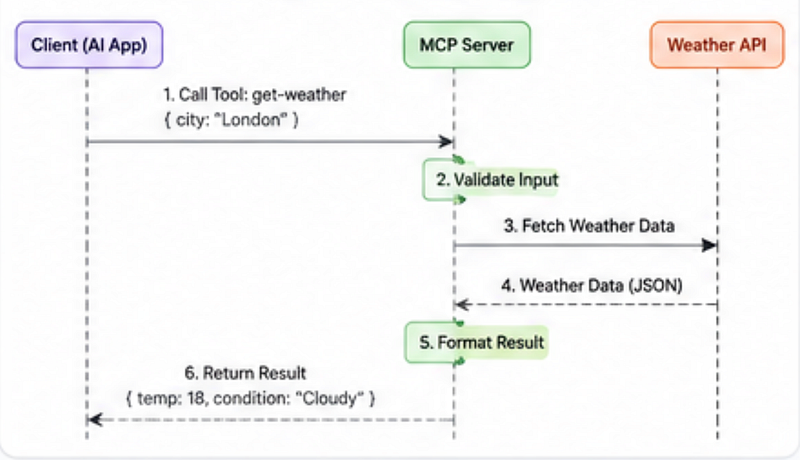
For example:
An AI model can ask:
“Get weather for Bangalore”
Your MCP server decides:
- Which tool to run
- What validation to apply
- What response format to return
This creates a cleaner separation between:
AI reasoning and tool execution.
If you still don’t understand MCP thoroughly, You can read more about it here.
Traditional AI Integration vs MCP
Traditional way
App → OpenAI → Custom Tool Logic → DatabaseMCP way
App → AI Model → MCP Server → Registered Tools → ServicesThe biggest benefit?
You stop rebuilding the same integrations repeatedly.
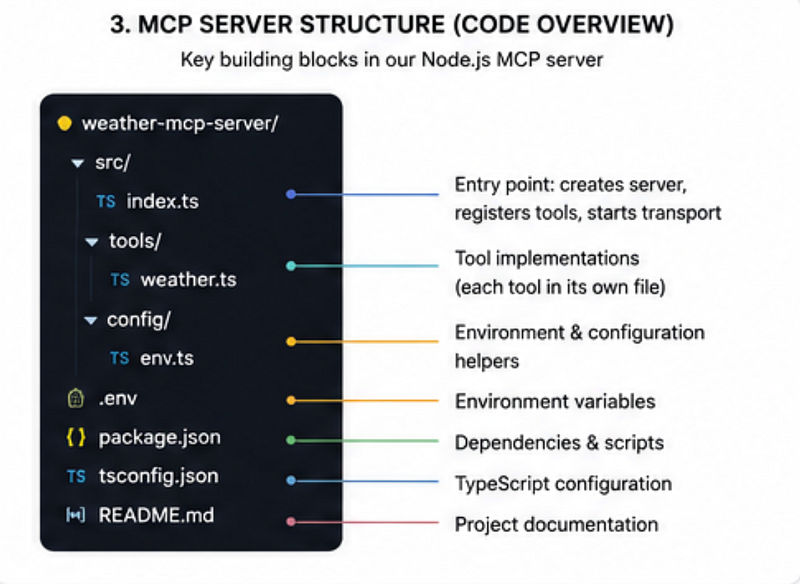
Step 1: Create a New Node.js Project
Start by creating a new project.
mkdir my-first-mcp-server
cd my-first-mcp-server
npm init -y
Install the MCP SDK:
npm install @modelcontextprotocol/sdk zodWhy zod?
Because validating inputs matters.
A lot of beginner implementations trust user input too much.
That becomes painful very quickly.
Step 2: Create Your First MCP Server
Create a file:
server.jsNow add this code:
import { Server } from "@modelcontextprotocol/sdk/server/index.js";
import { StdioServerTransport } from "@modelcontextprotocol/sdk/server/stdio.js";
import { z } from "zod";
const server = new Server(
 {
 name: "weather-server",
 version: "1.0.0"
 },
 {
 capabilities: {
 tools: {}
 }
 }
);
server.tool(
 "get-weather",
 {
 city: z.string()
 },
 async ({ city }) => {
 return {
 content: [
 {
 type: "text",
 text: `Weather in ${city} is sunny.`
 }
 ]
 };
 }
);
const transport = new StdioServerTransport();
await server.connect(transport);
Let’s break this down.
What this code does
- Creates an MCP server
- Registers a tool called
get-weather - Accepts a
cityinput - Returns a response to the AI model
At this stage, we’re mocking the response.
Later, you can connect a real weather API.
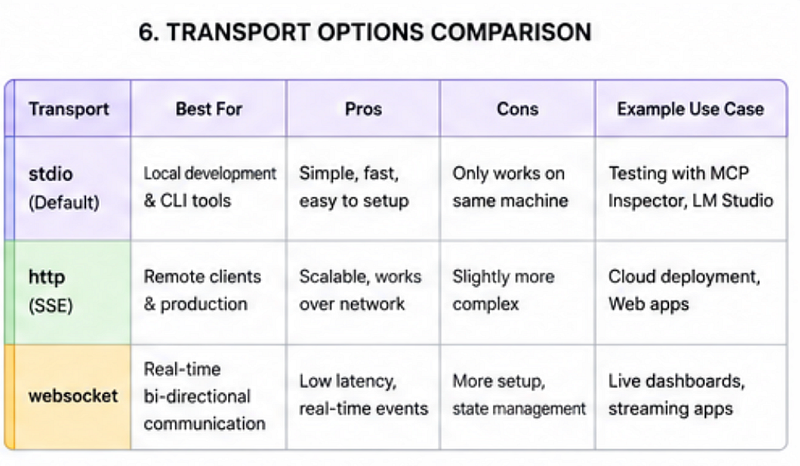
Why stdio Transport Matters
This part confuses many developers.
const transport = new StdioServerTransport();This allows communication between:
AI Client ↔ MCP Serverusing standard input/output.
It’s lightweight and perfect for local development.
Later, you can move toward HTTP-based transports if needed.
Step 3: Add Real Validation (Very Important)
Most beginner tutorials skip validation.
Bad idea.
Imagine someone passes:
{
 city: ""
}
or:
{
 city: 123
}
Your tool breaks.
Here’s a better version:
city: z
 .string()
 .min(2, "City name too short")
This tiny improvement prevents unnecessary bugs.
Common mistakes developers make
❌ Trusting model-generated input blindly.
Even AI-generated tool calls can be messy.
Always validate.
Real-World MCP Use Cases
MCP becomes powerful when tools start growing.
You can expose:
- Database queries
- GitHub repository access
- Slack automation
- File systems
- Internal company APIs
- Analytics dashboards
Example:
Instead of writing custom logic inside your chatbot:
AI → GitHub MCP ServerThe model can:
- Fetch pull requests
- Read issues
- Analyze commits
without tightly coupling logic inside the app.
Quick Comparison: Traditional Tool Calling vs MCP
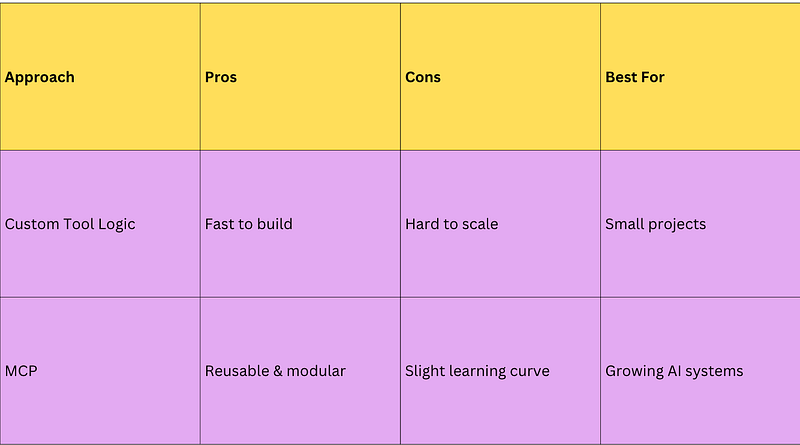
Here’s the surprising part:
MCP is not only about tools.
It’s really about standardisation.
That sounds boring… until your AI project reaches 20+ integrations.
Then suddenly, having a predictable structure becomes incredibly valuable.
Make It More Production-Ready
Before shipping anything, improve your setup.
1. Use Environment Variables
Avoid hardcoding API keys.
npm install dotenvimport dotenv from "dotenv";
dotenv.config();
const API_KEY = process.env.API_KEY;2. Add Error Handling
Bad implementation:
return fetchWeather(city);Better:
try {
 return await fetchWeather(city);
} catch (error) {
 return {
 content: [
 {
 type: "text",
 text: "Failed to fetch weather"
 }
 ]
 };
}
3. Log Tool Executions
Debugging AI systems becomes much easier.
console.log(`Tool called for city: ${city}`);Small improvement.
Huge debugging win.
The Surprising Payoff Most Developers Miss
Many developers think:
“MCP is just another AI buzzword.”
But here’s the unexpected part:
The real value of MCP isn’t writing smarter AI.
It’s building a cleaner software architecture.
When your tools become modular, reusable, and standardized, scaling AI systems becomes dramatically easier.
That’s the part most people realize too late.
Final Thoughts
If you’re learning AI development in 2026, MCP is worth understanding early.
You don’t need to master everything immediately.
Just build one small MCP server.
Experiment.
Break things.
Connect one real API.
That single project will teach you more than watching 20 tutorials.