Build a Production-Ready AI Chatbot Using JavaScript
Learn how to go from a simple Node.js server to a fully functional, secure, and deployable AI chatbot step by step
Building a chatbot today is no longer a complex, research-heavy task. With JavaScript and modern tools, you can create a powerful AI chatbot that works across platforms, handles real conversations, and scales efficiently.
This guide walks you through the complete journey — from a basic backend to AI integration, frontend setup, security, and deployment.
Step 1: Set Up Your Backend (Node.js + Express)
Your chatbot starts with a backend that receives messages and sends responses.
Initialise Your Project
npm init -y
npm install express
Create a Basic Server
const express = require('express');
const app = express();
app.use(express.json());
app.post('/chat', async (req, res) => {
 const { message } = req.body;
 res.json({ reply: `You said: ${message}` });
});
app.listen(3000, () => console.log('Server running on port 3000'));
👉 At this stage, your chatbot is just echoing messages — but this is your foundation.
Step 2: Add Basic Chatbot Logic
Before jumping into AI, start with rule-based responses.
app.post('/chat', async (req, res) => {
 const { message } = req.body;
 let reply;
if (message.toLowerCase().includes('hello')) {
 reply = 'Hi! How can I help you today?';
 } else if (message.toLowerCase().includes('job')) {
 reply = 'Are you looking for interview preparation tips?';
 } else {
 reply = 'I'm still learning. Can you rephrase that?';
 }
 res.json({ reply });
});
👉 This creates a simple decision-making chatbot.
Step 3: Integrate AI (OpenAI)
To make your chatbot intelligent, integrate an AI model.
Install Dependencies
npm install openai dotenvUse Environment Variables
Create a .env file:
OPENAI_API_KEY=your_api_key_hereAdd AI to Your Backend
import { OpenAI } from 'openai';
import dotenv from 'dotenv';

dotenv.config();
const openai = new OpenAI({
 apiKey: process.env.OPENAI_API_KEY
});
app.post('/chat', async (req, res) => {
 const { message } = req.body;
 const aiResponse = await openai.chat.completions.create({
 model: "gpt-3.5-turbo",
 messages: [{ role: "user", content: message }]
 });
 res.json({
 reply: aiResponse.choices[0].message.content
 });
});
👉 Now your chatbot can generate human-like responses.
Step 4: Build a Frontend Interface
Your chatbot needs a UI for users to interact.
Simple Example (Vanilla JS)
<input id="input" placeholder="Type a message..." />
<button onclick="sendMessage()">Send</button>
<script>
async function sendMessage() {
 const message = document.getElementById('input').value;
 const res = await fetch('/chat', {
 method: 'POST',
 headers: {
 'Content-Type': 'application/json'
 },
 body: JSON.stringify({ message })
 });
 const data = await res.json();
 console.log(data.reply);
}
</script>
👉 You can upgrade this using React for a better UI.
Step 5: Add Memory (Conversation History)
A real chatbot should remember context.
Simple Approach
let chatHistory = [];
app.post('/chat', async (req, res) => {
 const { message } = req.body;
 chatHistory.push({ role: "user", content: message });
 const response = await openai.chat.completions.create({
 model: "gpt-3.5-turbo",
 messages: chatHistory
 });
 const reply = response.choices[0].message.content;
 chatHistory.push({ role: "assistant", content: reply });
 res.json({ reply });
});
👉 For production, store this in a database instead of memory.
Step 6: Secure Your Chatbot
Security is essential when handling user data.
Best Practices
- Use HTTPS for all requests
- Store API keys in environment variables
- Validate and sanitise inputs
- Limit request rates (prevent abuse)
Example: Basic Validation
if (!message || typeof message !== 'string') {
 return res.status(400).json({ error: "Invalid input" });
}
Step 7: Add GDPR Compliance
If your chatbot handles user data, you need compliance.
Key Practices
- Show user consent before collecting data
- Avoid storing sensitive data unnecessarily
- Allow users to delete their data
Example consent message:
“This chatbot processes your messages to generate responses.”
Step 8: Deploy Your Chatbot
Once ready, deploy your chatbot for real users.
Option 1: AWS Lambda (Serverless)
- Scales automatically
- Cost-efficient
- Works with APIs
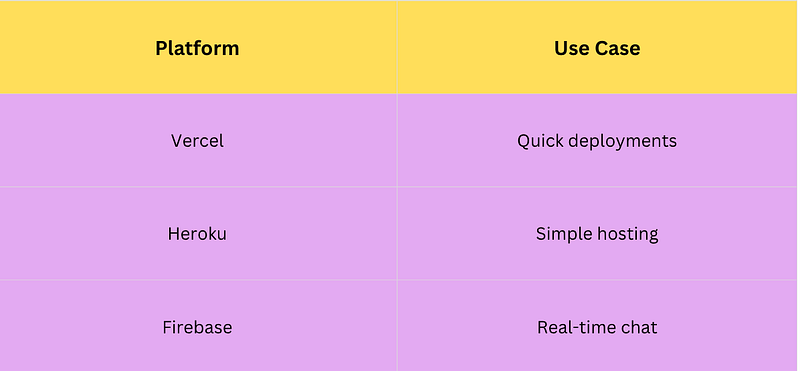
Option 2: Other Platforms
Step 9: Improve with NLP Libraries
Before sending input to AI, preprocess it.
Useful Libraries
- NLP.js → intent detection
- Compromise → text parsing
- Natural → tokenization
- Franc → language detection
Example Flow
- Detect language
- Extract entities
- Clean input
- Send to AI
👉 This improves accuracy and reduces cost.
Real-World Use Case
Imagine building a career coaching chatbot:
- Answers interview questions
- Suggests tech stacks
- Helps optimize resumes
- Provides personalised career advice
This can be built using:
- Rule-based logic for FAQs
- AI for personalised answers
- NLP for intent detection
Limitations to Consider
- AI responses may not always be accurate
- Handling sensitive data requires careful design
- Full GDPR compliance needs a custom implementation
- Scaling requires monitoring and optimisation
Key Takeaways
- Start with a simple Express backend
- Add rule-based logic before AI
- Use OpenAI for intelligent responses
- Build a frontend for user interaction
- Store chat history for better conversations