Integrating Meta Ads SDK Using Expo Config Plugins

Overview
Integrating various SDKs into a React Native project, especially when using Expo, can sometimes present challenges. Common issues arise when attempting to modify essential files like build.gradle or AndroidManifest.xml, as these files are regenerated during the build process, negating any manual changes. A practical solution to this problem is the use of Expo Config Plugins.
What Are Expo Config Plugins?
Expo Config Plugins are specialized tools that allow developers to extend and customize the configuration of their Expo apps. These plugins enable the inclusion of native modules that aren’t bundled by default, allowing for further customization of native code during the prebuild process.
Essentially, Config Plugins act as synchronous functions that modify the ExpoConfig object, providing a seamless way to bundle and configure native code using commands like npx expo prebuild.
Use Case: Integrating the Meta Ads SDK
Let’s walk through an example of integrating the Meta Ads SDK into a React Native project using Expo Config Plugins.
Standard Integration Process
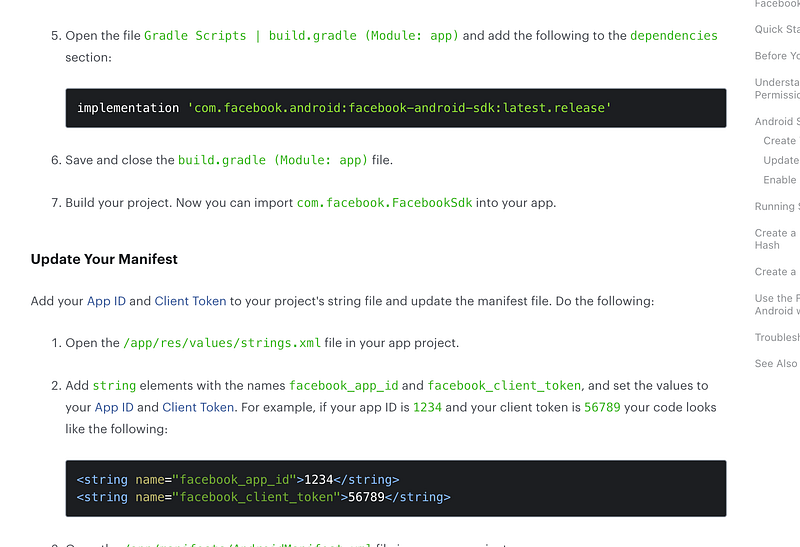
According to the Meta Ads SDK documentation, integrating the SDK typically requires updates to the build.gradle and AndroidManifest.xml files. However, with Expo, these files are automatically generated, making manual edits difficult to maintain. This is where Expo Config Plugins become invaluable.
You can read the integration docs here or look through the screenshot to understand how we can integrate them in native code.
Creating a Custom Plugin
To achieve similar configuration through Expo Config Plugins, we’ll create a custom plugin called withMetaSDK. This plugin will automate the process of adding the necessary dependencies and metadata to the project.
Plugins are synchronous functions that accept ExpoConfig and return a modified ExpoConfig.
Some basic rules for having a plugin
- It should start with
withex —withMetaSDK pluginsare always invoked when the config is read by theexpo/configmethodgetConfig. However, themodsare only invoked during the "syncing" phase ofnpx expo prebuild.
Step 1: Adding dependency in build.gradle file
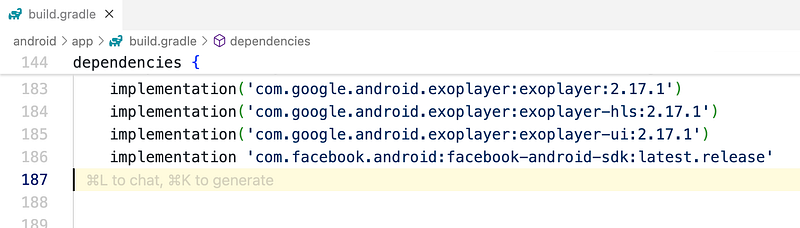
First, we’ll create a plugin to add the required dependencies shown in the screenshot into the build.gradle file:

const withMetaSDK = (config)=>{
 config = withAppBuildGradle(config, (config) => {
 const dependenciesToAdd = `implementation 'com.facebook.android:facebook-android-sdk:latest.release'`;
 config.modResults.contents = config.modResults.contents.replace(
 "dependencies {",
 `dependencies {\n${dependenciesToAdd}`
 );

 return config;
 });
 return config
};
This code snippet searches for the dependencies { block in build.gradle and injects the required Meta Ads SDK dependency.
dependencies {
 implementation 'com.facebook.android:facebook-android-sdk:latest.release'
}
Once we run this by adding our config plugin in app.config.ts file (This step we’ll going to see later) the resultant build.gradle will contain your dependency like this.
Note: We’ll going to run it after adding all the dependencies, So just follow along
Step 2: Modifying AndroidManifest.xml
Next, we’ll add the necessary metadata to the AndroidManifest.xml file using the withAndroidManifest plugin. You can see the required value in the Meta Sdk document.
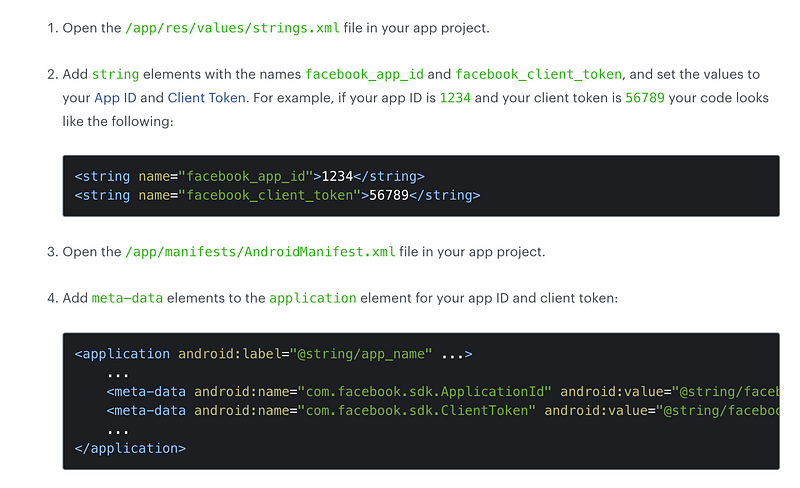
We can have the string values in the string.xml file similarly, we added meta-data in manifest.xml. We can use mods.android.strings to achieve this, but since we can directly add the env values in the meta-data, I am going to do that for this project.
const { withAppBuildGradle, withAndroidManifest } = require("expo/config-plugins");
const withFacebookSDK = (config)=>{
// To add dependencies in build.gradle file
config = withAppBuildGradle(config, (config) => {
const dependenciesToAdd = `implementation 'com.facebook.android:facebook-android-sdk:latest.release'`;
config.modResults.contents = config.modResults.contents.replace(
"dependencies {",
`dependencies {\n${dependenciesToAdd}`
);
return config;
});
// To add meta-data in AndroidManifest file
config = withAndroidManifest(config, (config) => {
const androidManifest = config.modResults;
// Check if the meta-data elements are already present
const appMetaData = androidManifest.manifest.application[0]['meta-data'] || [];
const metaDataFacebookAppId = {
$: {
'android:name': 'com.facebook.sdk.ApplicationId',
'android:value': "1234", //Replace this with Meta AppId secret
},
};
const metaDataClientToken = {
$: {
'android:name': 'com.facebook.sdk.ClientToken',
'android:value': "56789", //Replace this with Meta client secret
},
};
// Add meta-data elements if they do not already exist
if (!appMetaData.some(meta => meta.$['android:name'] === 'com.facebook.sdk.ApplicationId')) {
appMetaData.push(metaDataFacebookAppId);
}
if (!appMetaData.some(meta => meta.$['android:name'] === 'com.facebook.sdk.ClientToken')) {
appMetaData.push(metaDataClientToken);
}
// Update the manifest with the new meta-data elements
androidManifest.manifest.application[0]['meta-data'] = appMetaData;
return config;
});
return config
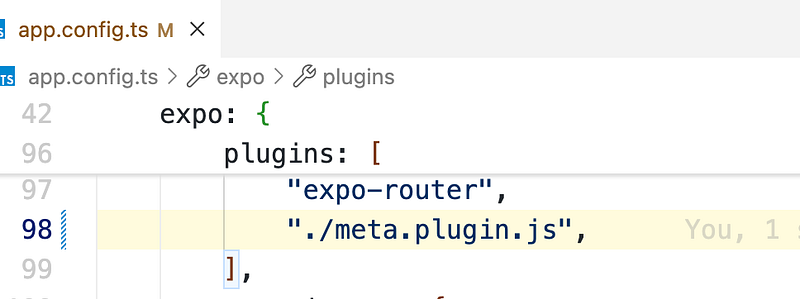
};Step 3: Applying the Plugin
Finally, to apply this custom plugin, add it to the app.config.ts file of your project within the plugins array:
Step 4: Building the Project
Now we’re done with creating the plugin now let’s make a pre-build to generate the android folder and see what we’ve configured is working or not.
Run the following command to generate a pre-build.
npm expo build
# or
yarn expo build
This will generate a native build with the necessary SDK integrations applied automatically.
Step 5: Testing the integration.
After successfully integrating the Meta Ads SDK using Expo Config Plugins, it’s crucial to test the setup to ensure everything is working as expected. Follow these steps to verify the integration.
- Build and Install the App:
- Build your app using Expo’s build tools (
npm expo buildoryarn expo build). - Once the build is complete, install the app on your mobile device.
2. Log in to Facebook:
- On the mobile device where you’re testing the app, log in to the Facebook account associated with your Meta Ads campaign. This is the account you use to run ads.
3. Access Facebook Events Manager:
- Open a web browser on your computer or another device and log in to your Facebook Events Manager.
- Navigate to the Data Sources tab.
- Under Data Sources, you’ll find a section labelled Test Events. Open this tab.
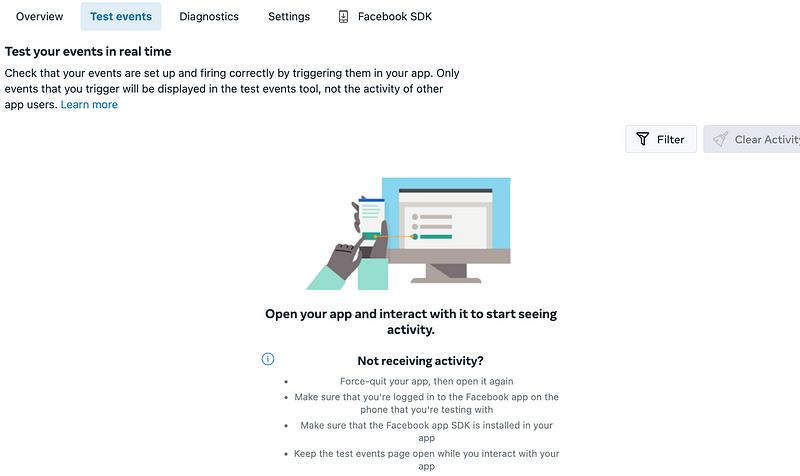
4. Interact with Your App:
- On your mobile device, launch the app that you’ve just installed.
- Begin interacting with the app as you normally would, triggering any events that you expect to track (e.g., opening screens, clicking buttons).
5. Monitor Event Activity:
- As you interact with the app, check the Test Events section in the Facebook Events Manager dashboard.
- You should see real-time activity being logged, confirming that the Meta Ads SDK is properly integrated and tracking events as intended.
By following these steps, you can ensure that the SDK is correctly configured and that the events are being captured accurately in Facebook’s system.
Queries
Hope you have enjoyed reading it and learnt something new and valuable from this article today.
Now If you have any doubts or queries feel free to drop a comment or connect with me on my Topmate.
You can also reach out to me on my LinkedIn and follow me for updates on latest blogs.
Please do like this post if you enjoyed reading it.
Thanks for the read :)
Also, you can support me and my writings by treating me to a nice virtual cup of coffee ☕️